Prompted by the arrival of our fabulous 100% linen sheeting range, here's a tutorial to show you just how easy it is to make your own fitted sheets. It might be easier to enlarge the images as you work through this post so just click on them if you need to see a bigger version. Bedding/sheeting measurements are provided in metrics so if you want the imperial equivalent, try this online converter.

What you need:
Sheeting
72" or 1.90mtrs x 6mm elastic
Thread
Using this chart below, work out your bed mattress width and length and add 40cm depth, at either end, at width and length. Note: If you own the new extra-high padded mattresses you may need to add 50cm depth.

In this case, a Queen size mattress measures 152cm x 203cm. After you add 40cm depth at each end, you end up with these measurements - 232cm x 283cm.
For our 265cm wide linen, you'll need 283cm (or round up to 285cm) in length. Note: you can't achieve this length across the width. With your mattress width measurement of 232cm, there should be an excess across the top of approx 33cm. Keep this excess as you can trim a queen flat sheet top with this amount.
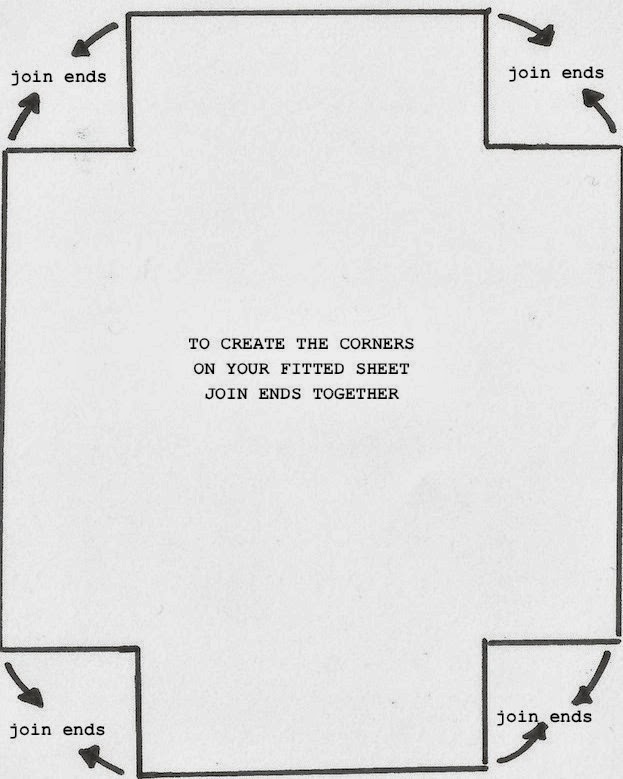
Cut 40cm x 40cm depth squares at each corner or fold whole piece in half, then half again (quarter), making sure that all sides are lined up perfectly and pin together. Here you can cut all 4 corners out at once.


French Seam On Corners - for a stronger, more stable corner seam on your fitted sheets, sew a french seam at the corners. First join and pin wrong sides together, taking a 1/4" seam and tapering off to a point at the corner end.


Trim back slightly.

Press seam all to one side, then join and pin right sides together and sew 1/4"seam, making sure to taper at the corner end.
Now that the corner seams are all joined together, fold piece at the corner seams lining up raw edges evenly and measure out from the corner seam line approx 13" and notch at this point on both sides. Note: The measurement from notch to notch with the corner seam in the middle will be 26". This will mark the positioning for the elastic at the corners.

Press raw edge back 1/2" towards wrong side of fitted sheet.

Cut four pieces of 6mm long life swimwear elastic 18" (46cm) long.

Fold cut elastic in half, placing a pin in the centre. Line up pin at corner seam point on top of pressed back edge, lining up bottom edge of elastic with raw edge. Make sure that you can see some fabric at the top folded edge (about 2-3mm).

Stretch out elastic ends at either end and pin to notch marks.


Sew using zig zag stitch along top edge of elastic. Do not sew on folded edge.


When zig zag sewing elastic into place, stretch and pull at back and front to keep sewing edge flat when sewing.


Now that elastic has been sewn at all four corners, next turn back edge again 1/2" towards wrong side of fitted sheet and edgestitch at bottom edge all around fitted sheet area. Make sure you stretch and pull at back and front to keep sewing edge flat when sewing around corner edges with elastic, and that you are sewing at fabric edge above elastic at these corners (do not sew on top of elastic).


You're done! Enjoy sleeping in crisp linen sheets this summer.

PS. Please leave a comment if you'd like a tutorial for making a flat sheet and standard pillow slips.
I would definitely love a tutorial on flat sheets, pillow slips and maybe doona covers?
ReplyDeleteyes yes and yes
ReplyDeleteThank you for this tutorial Colette! I will be doing my fitted sheet this weekend. I would just LOVE a tutorial on the rest of the bed linen - yes please!
ReplyDeleteAnd please keep the 100% linen sheeting as part of the Tessuti range - it's the loveliest thing, ever!
Thank you! I was just wanting to make some the other day but malaise on measurements held me back.
ReplyDeleteyes and yes (please)
ReplyDeleteI was just about to buy new sheets but I'm now going to make them using your linen sheeting.
Spud.
Awesome. So going to make me some of these. And yes please, tutorials for the rest.
ReplyDeletehttp://tessuti.blogspot.com.au/2013/10/tutorial-how-to-make-your-own-flat.html
DeleteYes would love tutorials on full bed sets!!!!!! !! Thanks so very much!!!!!!
ReplyDeleteHi Linda,
Deletehttp://tessuti.blogspot.com.au/2013/10/tutorial-how-to-make-your-own-flat.html
Very confused as to why you are quoting some measurements in inches , not in centimetres, and others in centimetres only ,for the instructions of the same pattern.
ReplyDeleteLinda C.
Hi Linda C
DeleteAs per the post intro, I've quoted bed measurements in metrics and sewing references in imperial, the latter being simply because that's what I use and how I was taught. I'm aware that not everyone (depending on location and/or preferences) does it this way which is why I provided a conversion link. I can assure you that no confusion is ever intended in any of my posts or instructions.
Tutorials for the other two patterns please - I feel the urge to sew coming on after about a 25 year hiatus!
ReplyDeleteHi Atholie,
Deletehttp://tessuti.blogspot.com.au/2013/10/tutorial-how-to-make-your-own-flat.html
turning a old winter flat sheet by cutting it norrower and adding the piece on the bottom for our roof top tent. my sheet had to be 1.400 wide and 2.350 long. made it with the elastic around the bottom .... very excited about the snug fit
ReplyDeletecurious....can you make 2 Twin long fitted sheets from 1 fitted King?
ReplyDeleteThank you for this tutorial on fitted sheets. I was trying to follow other blogs on this and messed up two flat sheets. I almost gave up until I found your blog. I was very confused with the measurements and cutting until I followed your instructions. Your instructions are clear and easy to follow. The conversion link was a great help to me. Thank you again and kind regards.
ReplyDeleteLydia
I need help. I have had success making the fitted sheet, but I need to make a sheet for a boat mattress. It has a small square cut out piece on one of the sheet's sides and I don't know how to make this so that there will be tuck-in fabric going at right angles to each other. Do I need to cut a certain shape to add to this inside corner? I hope this makes enough sense for someone to have a suggestion. Thank you - I'm going crazy!
ReplyDeleteSue
Thank you for your simple tutorial and I'm going to try it. Finally I know what to do with unused flat sheets:))
ReplyDeleteHi can you please tell me how long it takes to make one. Thanks
ReplyDeleteHi Honnie Dobber,
DeleteOnce cut out, you can definitely make it in a few hours. Made a whole sheet set (fitted, flat and pillowcases in half a day including cutting time)
Thank you for the clear and detailed tutorial. I, too, would love to have the tutorial for flat sheets and pillow slips. My grandmother treasured her heavy cotton sheets, and they never greyed as do our cotton/poly, no-iron sheets of today as they age.
ReplyDeleteAN OLD-FASHIONED TIP FROM MY GRANDMOTHER (1881-1977). To keep cotton sheets snow white, in the summer, she would often lay them flat on the grass to dry. My mother later explained to me that the theory was that the reaction between the sun and the chlorophyll in the grass was "nature's bleach"! Never a less-than-snow-white sheet at Grandma's house, no matter how old they were!
it is not that i urgently need a bedsheet but my mother in-law made me sew one.. i gotta tell you Colette that this helps a lot. thanks for making me look like a capable handy do-all thing girl that my mother in-law proud of. lol.
ReplyDeleteI like what you have done SO MUCH better than had you decided to create a you tube video! Thanks for alerting us that you might demonstrate flat sheet and pillowcase ideas next. I have been looking for the "how to" of creating a pillowcase with a pocket that holds the pillow into position. Celestine
ReplyDeleteDimanche le vingt six juillet 2015
Do you have a ratio for how much elastic you need for different sheet sizes?
ReplyDeleteHi Anonymous,
DeleteI made these fitted sheets 2 years ago, and don't recall. Note I added only to the corners, so the lengths here would apply to all sheet sizes too
So you only have elastic on the corners?
ReplyDeleteYes Anonymous, it works perfectly well having the elastic only at the corners. Makes the fitted sheet easier to fold too.
ReplyDeleteYes Anonymous, it works perfectly well having the elastic only at the corners. Makes the fitted sheet easier to fold too.
ReplyDeleteI came across this tutorial after making some crib sheets and thought it would be great to custom-make my own bedding to match a duvet cover I bought. I ended up buying a lovely sheet set and because I never use the top sheet, I made a second fitted sheet out of it - thanks for your helpful tutorial!
ReplyDeleteThanks for the detailed explanation and picture . I have struggled with this task for years and couldn't get it right.
ReplyDeleteYes please do more tutorials
ReplyDeleteHi Jennyjacks - http://tessuti.blogspot.com.au/2013/10/tutorial-how-to-make-your-own-flat.html
DeleteUsed your tutorial as a guide for a inflatable mattress in a baby's traveller portacot. Minimal depth so only needed small "tuck under" section. Worked really well, though I put the elastic all the way round the edge. The advice to taper into the corner with the French seam makes a nice finish. Thank you.
ReplyDeleteWould like the tutorial for a flat sheet also, Thank you.
ReplyDeleteHello! The tutorial for a flat sheet is here - http://tessuti.blogspot.com.au/2013/10/tutorial-how-to-make-your-own-flat.html
DeleteTankyou very much !
ReplyDeleteGrazie infinite!
I do this to my flat top sheet, but only the two bottom corners, that why it stays put.
ReplyDeleteReally wish you had provided inch measurements! The converter link does not work for me and it is hard enough to follow instructions. Know you were trying to be helpful, but this simply didn't help me.
ReplyDeleteThanks for this tutorial. It was really helpful.
ReplyDeletePlease put this in inches. I'm new at sewing need very simple instructions. Thank you
ReplyDeleteThis tutorial has made it quite clear and easy for me to stich my bedsheet. I'll try tomorrow. Thank you so much!
ReplyDelete